
Purchasing an RV opens the doors to endless adventures and fun family memories. However, RV ownership also means regular maintenance and repair projects.
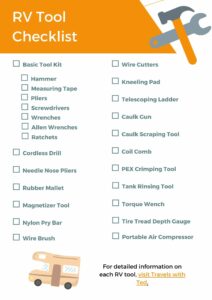
Unless you intend to pay a shop over $100 per hour every time something needs a tune up, you’ll need special tools. Below is our complete guide to essential tools for RV owners, including everything your need to build your RV tool kit.

We’ve also compiled an Amazon list with all of the below items. Click here to start building your RV tool kit today!
These basic tools are useful in any home, but they are essentials for RV owners. RV components break (frequently), so every camper needs these everyday tools for repairs.

Every RV owner, should start with a basic household tool set that includes a hammer, measuring tape, pliers, Phillips-head and flathead screwdrivers, wrenches, Allen wrenches and ratchets.
These basic tools will come in handy for both minor repairs, like tightening loose screws, and bigger projects, such as appliance repairs. Craftsman’s 102-Piece Home Tool Kit is a great starter set that retails for less than $100.
The set comes in a thin box that easily stores in an RV’s basement area. Even if you already have these tools at home, we recommend purchasing a separate set of tools that stays in your RV, so they cannot be forgotten.

Another basic tool, every RV owner should purchase is a cordless drill. Drills often come in handy to remove covers from RV appliances and replace screws. Cordless drills are ideal for RV camping as they can be easily carried into tight spaces.
If kept charged, cordless drills can also be used when boondocking or dry camper without access to power.
The Dewalt Compact Drill is a great option for RV owners. The compact, lightweight design is perfect for use in the tight corners found in most campers and motorhomes. A battery and charger are included with the drill.

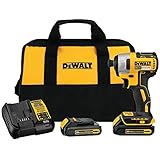
Our impact driver is our most used power tool in our extensive RV took kit. This tool makes it super easy to remove lug nuts from your RV or tow truck. It was also very helpful when we needed to replace our leaf springs and equalizers.
The DeWalt Cordless Impact Driver is a good option because it is lightweight, allows for one-handed loading and has a built-in light.
When purchasing an impact driver, always purchase the same brand as your cordless drill so you can use the same batteries for both tools. This saves you time and money.

To use an impact driver (and a torque wrench), RVers also need a socket set. The DeWalt Impact Socket Set includes 8 sockets and 2 adapters. Plus they come in a compact carrying case.

While your basic tool kit will include needle nose pliers, RVers should also purchase pliers with an extended handle. As we will repeatedly note throughout this article, RVs have many hard to reach spaces and tight corners.
Extra-long needle nose pliers, like the above 11-inch version made by Vise-Grip, will help you reach screws in places where your hand won’t fit.

A rubber mallet is another tool that is especially helpful for RVers. When pounding a nail in a tight space, the last thing you want to do it miss and knock a hole in your RV.
A rubber mallet can be used like a hammer, but is less likely to cause damage. Rubber mallets are also great for securing and removing wheel chocks under RV tires.

Have you ever laid on your back and tried to insert a screw at a strange angle in a small space? Well, if you buy an RV, you probably will someday. Without a magnetizer tool, you will drop said screw hundreds of times before succeeding.
This handy magnetizer by Klein Tools magnetizes the tip of a screwdriver head, so screws will stay secure as you start to turn. Simply insert the screwdriver head into the magnetize compartment to turn it magnetic.
After finishing the job, the tool also has a demagnetize compartment so your tools won’t get stuck together in storage.

Pry bars are handy when opening sealed compartments to reach RV appliances and other components. However, typical metal pry bars tend to scratch surfaces.
These nylon pry bars are perfect for use in an RV as they are lightweight and will not scratch interior or exterior surfaces.

While most modern RVs are equipped with automatic leveling systems, a standard level is useful to verify the electronic system.
Leveling your RV isn’t just for your comfort. An unlevel RV can turn your RV refrigerator into a fire hazard.
We own a 24-inch level, like this one by Amazon Basics, which we also use as a ruler to verify there is sufficient room for our slide outs when parking.

Wire cutters or a wire stripping tool are necessary for any electrical project. However, even RVers who are not electrically savvy should have this tool on hand for basic projects.
For example, RV gas alarms are notorious for failing before their expiration date. They are simple to replace, but only if you have a wire cutting tool.
This comprehensive wire cutting and stripping tool by Vise-Grip should be sufficient for all your basic RV repair needs.

When inspecting the underside of your RV or repairing anything low to the ground, a kneeling pad is the key to being comfortable.
Many RV campsites are concrete or gravel surfaces that will scrape knees, and many RV components are low to the ground. Therefore, a kneeling pad is an essential item for any RV tool kit.
Klein Tools makes a 1-inch thick foam kneeling pad to protect your knees while working.

One of the largest essential tools for RVers is a telescoping ladder. These strong, but compact ladders fold down so they require minimal room for storage.
While most RVs are equipped with a ladder to the roof, these ladders are often flimsy and only provide access to one spot on the roof. A telescoping ladder allows RV owners to reach awnings, slide outs and any part of the roof without actually having to climb on the roof.
The telescoping ladder pictured above extends to a maximum length of 15.5 feet and has a load capacity of 330 pounds. Made of aluminum, the ladder is lightweight and folds down to just 3.2 feet.
Repairing seals is one of the most frequently needed, and one of the most important RV maintenance tasks. Strong seals keep water out of your RV.
See our guide to RV seals for step-by-step instructions on repairing exterior and roof seals.

RV sealants come packaged in tubes made to fit into a caulking gun. Therefore, a caulking gun is an essential tool for basic RV maintenance.
A simple caulking gun, like the above one from Newborn, will allow you to easily apply new sealant.

Before applying new sealant around windows and doors, the old sealant will need to be removed.
A caulk scraping tool helps RVers removed old, cracked sealant before starting a repair. The above 3-in-1 caulk tool also has functions to help smooth caulk and clean-up residual sealant.

Of course, sealant is a key tool for repairing seals. Don’t just use any old sealant on your RV, make sure you have the proper sealant on hand for each job.
Cap sealant is used to seal around all the vertical services of an RV’s exterior, including windows, appliance compartments, entry doors and storage bay doors. We prefer to use clear cap sealant, but it is also available in a variety of neutral colors.

While cap sealant is used on vertical services, lap sealant is used to repair seals on RV roofs.
We strongly recommend using a self-leveling lap sealant, which levels itself for easier application after being squeezed out of the tube. The process is faster and cleaner than using a non-leveling sealant.
For RV appliance maintenance, there are a few specialty tools required.
If you plan to handle your own RV maintenance, purchase the following tools for your RV tool kit, then buy our RV maintenance eBook to learn everything you need to know about proper RV appliance care.

Air conditioning is one of the major features that makes RV travel glamping instead of camping. However, for RV air conditioners to cool properly, they need to be thoroughly cleaned at least once each year.
Part of the AC maintenance process is straightening and cleaning the unit’s evaporator coils. A special coil comb is the most effective tool for the job.

The plumbing line connections in RVs are attached with clamps. These clamps can easily come loose during travel or due to high water pressure. Once a clamp detaches, water will flow out and can cause a major flood.
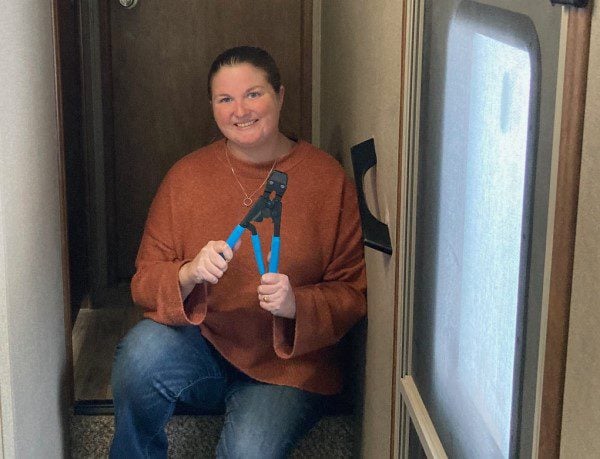
These fittings should be checked regularly to ensure they are tight and undamaged. When a loose or broken clamp is discovered, you will need a PEX crimping tool in your RV tool kit to attach a new clamp.

Water heaters are another RV appliance that require annual cleaning and maintenance to ensure proper functioning.
A special tank rinser tool is need to flush out your water heater to remove build-up and debris.

If your RV water heater is a Suburban model, you will also need replacement anode rods in your RV tool kit. Anode rods are a component of Suburban RV water heaters that attract corrosive elements in the water to prevent damage to the tank.
Over time, these rods corrode and need to be replaced. Keep at least one anode rod on hand, and replace your old one during annual maintenance.

Wire brushes are great for the removal of rust and other stubborn surface contaminants. For RVers, wire brushes are an important tool for furnace maintenance.
These brushes are used to effectively remove any corrosion found on the furnace’s burners.
In addition to actual tools, there are also some sprays and greases that should also be kept in your RV tool kit. These solutions are used for maintenance and cleaning.

The handles used to open an RV’s gray and black tanks need to be regularly lubricated to prevent them from sticking. Keep a can of Teflon lubricant in your RV toolbox and use it on the tank handles at least once each month.
To properly lubricate the handles, first, empty all of your holding tanks. Then, pull one handle out and spray the lubricant on the metal rod. Slowly pull the lubricated handle in and out a few times.
Repeat for the other tanks. Always pull the handles straight out, twisting can damage the connected cables.

For campers who own a towable RV, grease is another key item for your RV tool kit. We use Super White multi-purpose grease, which comes in an easy application squeeze tube.
Travel trailer and fifth wheel owners should apply a thin layer of grease over the entire ball before hitching up their RV. To avoid getting grease on your hands, use a paint brush to apply it.
To prevent grease from getting on other things and to protect the ball, cut an X into a tennis ball and place it over the hitch ball while parked.

Earlier, we talked about the need for a specialty coil comb to clean part of your RV air conditioner. For a thorough cleaning, you will also need to use a spray on coil cleaner after using the comb.
Coil cleaners are made for all types of air conditioners, so the product does not need to be RV-specific. However, you should purchase a coil cleaner that is self-rinsing, so you can just spray it and leave it.

The last item on our list of sprays and solutions for your RV tool kit is Reliable 1 All Purpose Cleaner.
Designed for use on boats and RVs, this cleaner is the most effective way to remove stubborn black streaks from your RV’s exterior.
RV and travel trailer tires needs to be inspected regularly and well cared for until they are replaced. There are a few special tools RV owners need to take care of their rig’s tires.

A tire gauge is simple tool that allows you to check the tire pressure of each tire. Tire pressure needs to be checked before each RV trip and at stops if tires look low.
This small handheld tool should be kept in an easily accessible spot in case tires need to be checked during travel.

Ideally, RV owners will travel with a portable air compressor in addition to a tire gauge. The air compressor can be used to adjust tire pressure on the spot, so you never have to drive away with low or high tire pressure.
The above Craftsman air compressor comes with 3-power sources, including a 20V battery, an AC wall plug and a12V car adapter plug, meaning it can be used at RV parks or on the side of the road.
Air compressors are also useful for routine RV appliance maintenance. Blowing the compressed air is a safe and effective way to clean debris from appliances, such as water heaters and air conditioners.

RV owners should also own a torque wrench to adjust new tire lug nuts. After removing or replacing a tire, the lug nuts must be torqued. Torque the lug nuts both when the new tire is put on and after driving 50 miles.
To torque lug nuts, set your torque wrench to the proper foot pounds (check your owner’s manual). Then, place the socket on the nut and turn the handle until it pops. Always torque in a star pattern, moving diagonally around the tire.

Next, purchase a tread depth gauge to measure your RV tires’ tread depth. Shallow tread depth is an indication that tires have worn too much and need to be replaced. This simple tool allows you to verify tire wear, instead of guessing.
To use, simply place the gauge in the cracks of your tire’s tread located near the tire indicators. If your tire’s tread depth is below 2/32 of an inch, it’s time to replace your tires.

For campers who own a travel trailer or fifth wheel with more than one axle, the Trailer Aid Tandem Tire Changing Ramp is a great RV tool kit addition. The ramp makes changing a flat tire super easy!
To use, simply drive the other tire onto the ramp and it will raise the flat tire off the ground so you can change the tire without a jack. Always travel with a spare tire for your trailer, and pull as far off the road as possible before working on it.
If you made it this far, you now understand just how much work it is to own an RV. If you purchase and organize your RV tool kit according to our instructions, you should be well prepared to handle most issues that arise.
To better prepare yourself for RV ownership and prevent many RV issues, purchase our eBook, The Owner’s Guide to RV Maintenance. In the book we share step-by-step instructions for all essential RV maintenance tasks.
Do you have any questions about RV repair or maintenance? Drop them in the comments section below.
Christina Pate is a seasoned full-time RVer who, along with her husband Justin, has journeyed across the US, Canada, and Mexico. Drawing from her extensive travels, RV repairs and RV renovations, she founded Travels with Ted to guide and inspire fellow RV enthusiasts. Christina is also the co-author of The Owner’s Guide to RV Maintenance and the creator of My RV Log Book.